
English Paper Piecing, Tutorials
EPP Guide for Tiny Pieces
Part 1
English paper piecing is normally used with larger, geometric templates…not small, fiddly pieces. I LOVE the precision and ease of English paper piecing…so I use smaller pieces to create details that are normally reserved for foundation paper piecing.
I’ve discovered an easy way to deal with small or thin templates, so you don’t have excess bunching.
Tip 1:
Fold the smallest/shortest edge first. This will make that side crisper, and have less bulk.
Tip 2:
Leave the outside edges open.
1. This allows for less bulk, but it means that I can machine sew blocks together instead of needing to hand stitch them together (I like to keep my options open.
I lift all the corners of my outside edges so I don’t pick up threads from the fold….then I HAVE to do quilt block surgery, or hand stitch blocks together…OR! What if the block is on the edge of the quilt?! ACK!
2. By leaving the outside edge free, it makes the piece less fiddly.
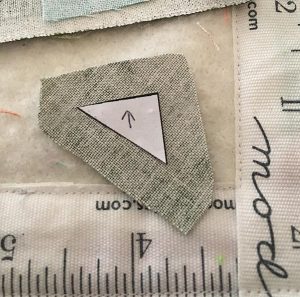
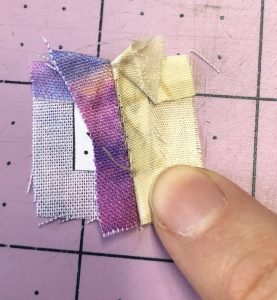
With this block, I basted the top, then the long side…and I left the right side open (see below). I’d lift this edge anyhow…I might as well save a step. You can see a few other blocks around it that are left open.)
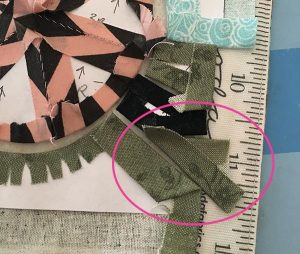

If you have thin pieces, you can do the same thing. For this block, I would glue baste the inside curves, and leave open the pieces that will be joined together. Join these to the outside curves.
Then lift the fabric on the inside curve, and glue down the fabric on the straight sides.
When you iron and remove the papers, everything will lay flat!
Part 2
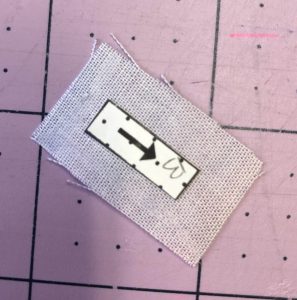
1. Put a bit of glue on the back of the paper template to hold the piece in place.
2. I almost always start gluing with the shortest edge. To deal with the corners, I pinch them to create a 45 degree angle. It doesn’t really matter how the seams nest. It matters more to me how tight the pieces can fit together.
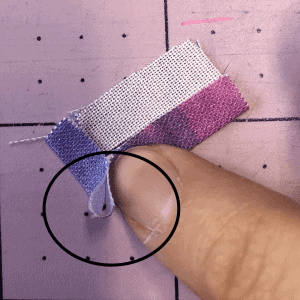
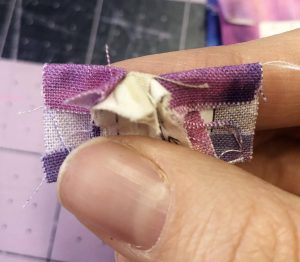
3. When you are basting the small piece think of the order they need to be joined. For the example, you can see that I did not baste the top (shown on the bottom, where my finger is, or the sides. I am most concerned about joining the middle piece (beige) to one purple piece, then attaching another purple piece on the other side. See that only 2 sides of the 2 pieces are basted, and they are joined in the middle. After they are joined, I will lift the sewn edge on the beige piece, and open it. Then I will glue the opposite edge to the template. Then sew the additional purple piece, so the beige piece is enclosed. Again, my goal at this stage is to join purple- beige-purple, then the piece along the bottom. I’m not concerned with basting all sides.
4. Now I have a straight edge. Since the 3 pieces are joined, and I must join the next piece, I will lift the sewn edges of the purple pieces, and baste the exterior edges. I still have not basted the opposite edge. You will now have 3 sides basted.
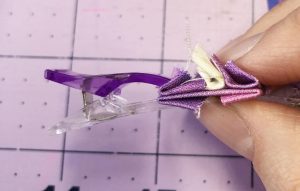
5. You will notice that the bulk of the fabric made one unit longer than the other. This is ok! Clip one edge to hold in place – make sure that the corners line up as best you can. Take a couple stitches, then line up the other end, and use your thumb to ease in place.
6. Lift up the seams in the corners on the opposite side, and baste the pieces to create a straight line (it should look like Step 4. Baste and repeat Step 5.
Part 3
Here is a video that may help you as well.
Hello,
What scissors do you recommend to cut out templates?
thnks, Carri
Hi Carrie, do you mean the paper template? I use a rotary cutter to cut the square, then either whatever scissors I have handy (not fabric cutting scissors!!), or a rotary cutter, depending on the pattern. My favorite scissors are small grade school scissors.