
English Paper Piecing
Easing With Ease
One of the best and worst parts of English paper piecing is easing. It’s the best because you can really get corners to match neatly and nearly perfectly…and it’s the worst because of all.that.bunching!
I have noticed that easing is like any middle of the project – you wonder if it’s going to turn out well. Don’t throw in the towel if your pieces are wonky and misshapen. I have never had a block turn out horrible…yours won’t be the first! 😉 Just keep going until the block is done, and it’s had a good pressing!!
What causes the need to ease the pieces? Fabric. Not all fabric is the same thickness. Not all fabric is folded in the same way – though for small pieces, I DO refold, so that it redistributes some of the bulk.
With traditional piecing or sewing, I sometimes feel that easing is user error (ahem me!), but with EPP, it gives great flexibility to make the pieces fit!
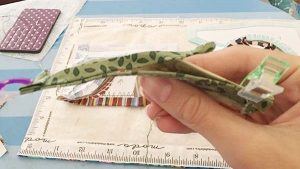
Step 1. Clip both sides with little binding clips. (I like these). Make sure the edges match. I like to unglue the corners if the pieces are outside edges. This allows me to machine piece blocks together, instead of hand piecing blocks together.
NOTE: When I match my pieces together, I’m not concerned about where the clips are…I’m more concerned that the edges are flush. I move my end clips once I get everything in place how I want it. In these pictures, you’ll see that the green clip on the right is not in a good position to start piecing. Before I start stitching these blocks together, I’ll move the green clip to the side, like the purple clip.

Step 2. Add a clip in the middle, and distribute the bulk evenly. If you have a large piece, or lots that needs to be eased, you may need to add a clip to the middle of the smaller section. I tend to use a max of 4 clips…I don’t clip both sides, if I need to ease a lot. I find it’s easier to work with the smaller section, and move clips, rather than have extra weight. It might not seem like much weight, but it all adds up, and puts strain on your wrists.
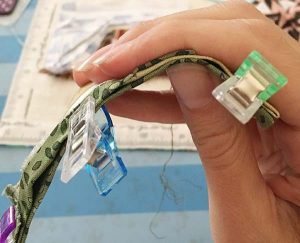
Step 3. I hope I can explain this step easily. I am left handed, so I hold my pieces with my right hand. I start stitching from the right, and work to the left. If you are a rightie, you’ll likely do the opposite. What is the same is you’ll want the excess fabric on the top, opposite your thumb. You’ll use your forefingers to push the pieces around your thumb. This will decrease the excess fabric, and allow for even distribution.
Then you’ll stitch as you normally would. This method won’t work with a flat back stitch.
There you go! Now you know my secret to easing! I hope this is really helpful to you!
I would like the moose pattern nd big horn sheep pattern to be smaller. Can I just print at 50% size to get a 4.5 inch square block?
Theoretically yes. I would measure the block to make sure it IS 4.5″ before you sew….printers can be weird, so you might have to play with the percentages.
If you are sewing the moose and big horn sheep in EPP, I would take it easy. I made both patterns larger because they were annoying to me in a smaller block.
If you are using FPP, MAKE SURE that your seam allowance is 1/4″ and not the 50% smaller – that would be 1/8″ and far too small.
Happy Stitching!!!